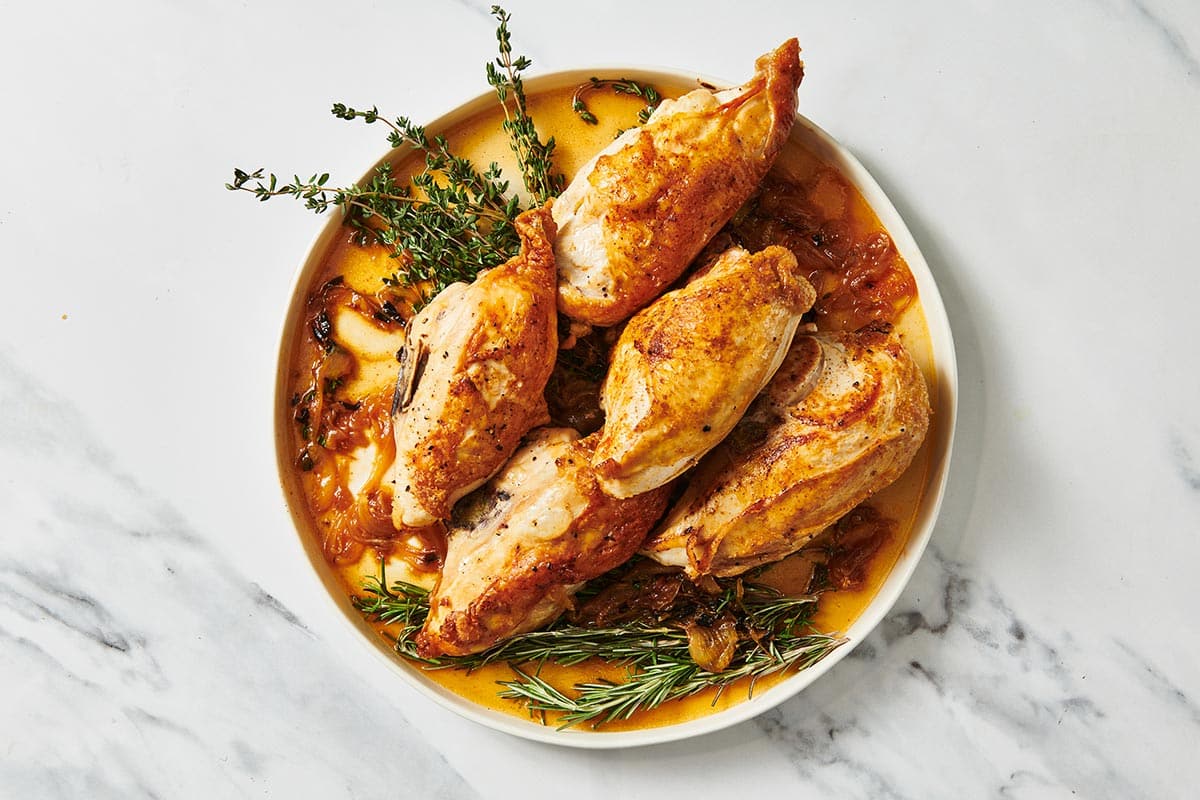
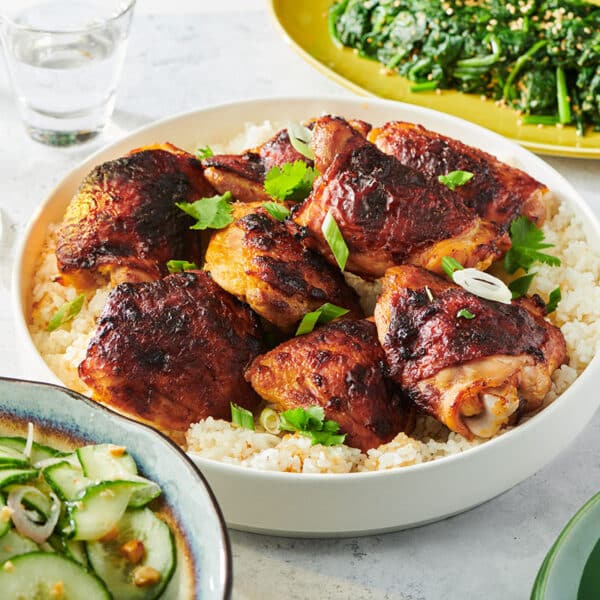
Baked Bone-In Chicken Breasts
Updated Dec 25, 2025
This post may contain affiliate links. Please read our disclosure policy.
With juicy meat and crispy skin, this fast, simple, and flexible chicken recipe is a great dinner for any night of the week (and leftovers can turn into another meal in endless ways).
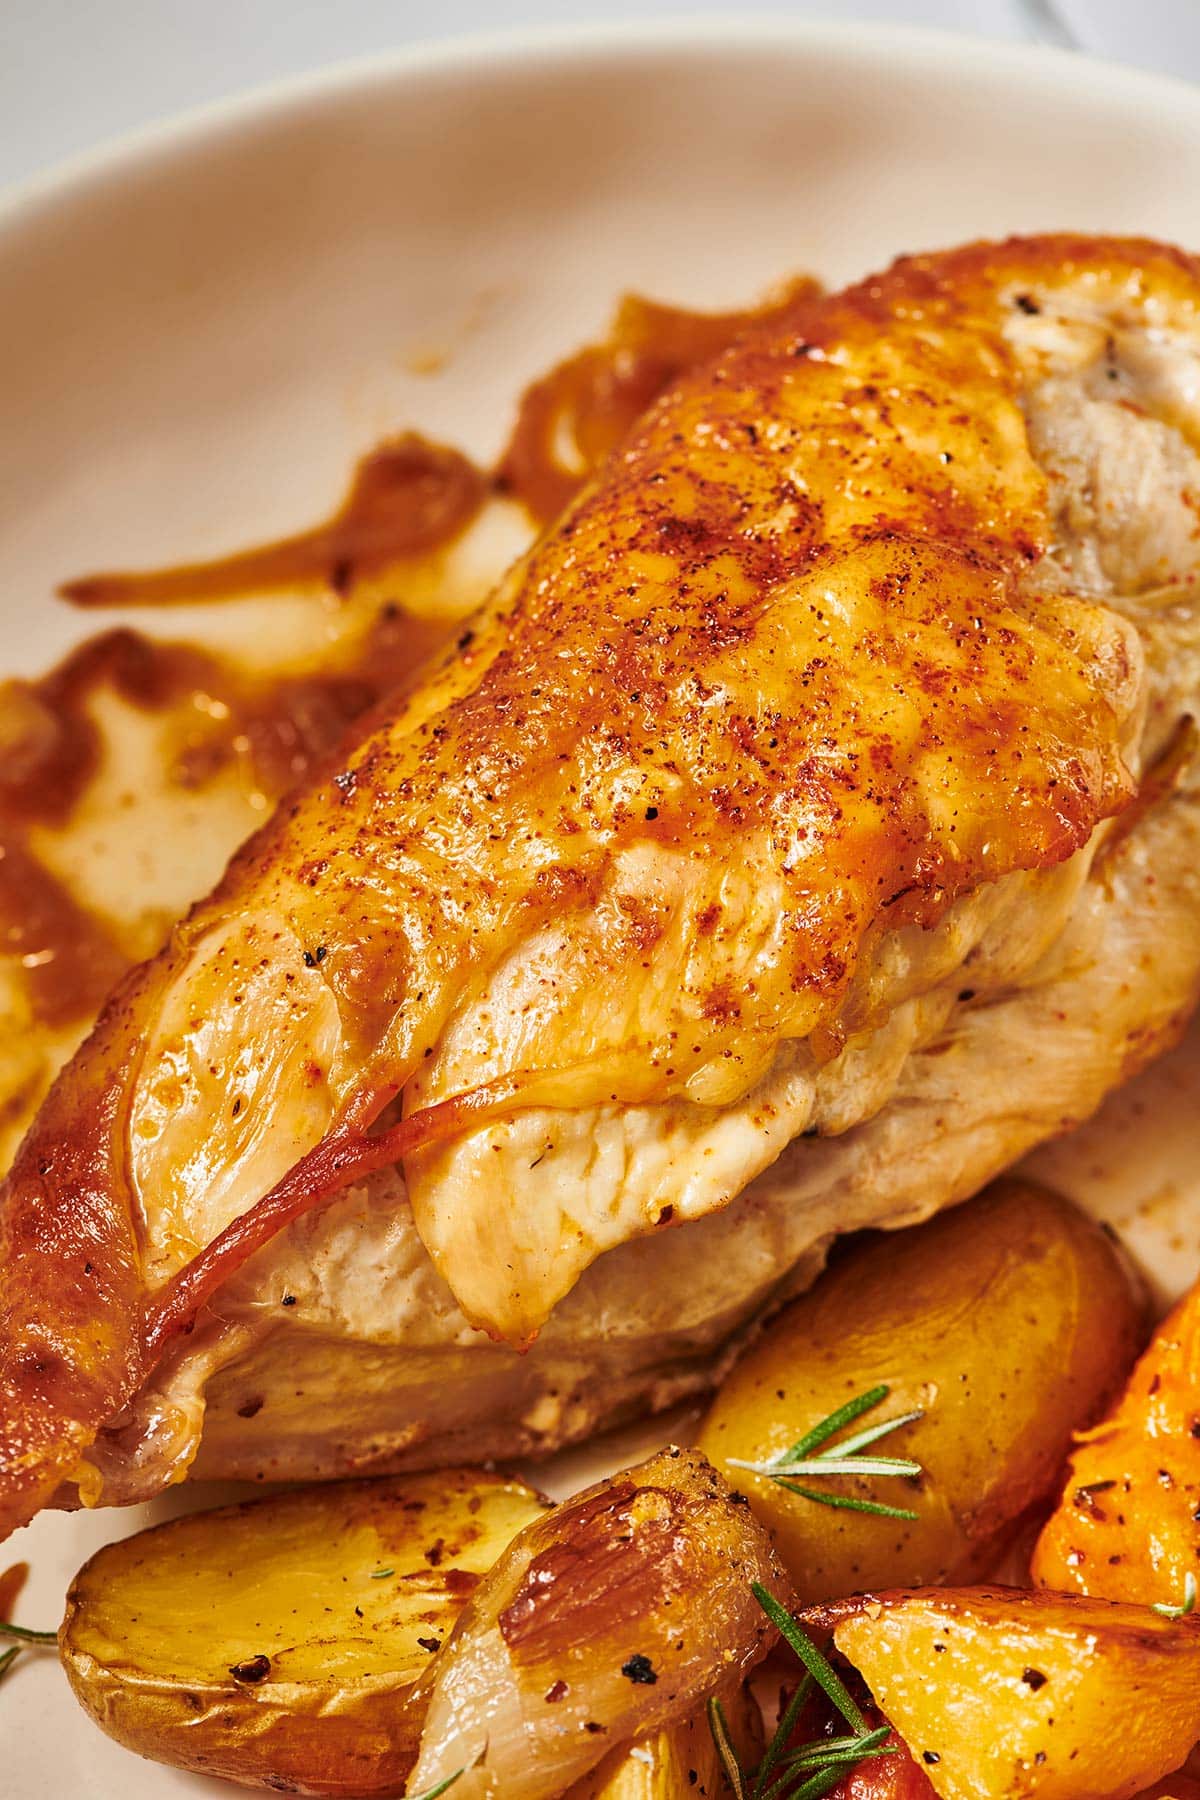
This is the best and easiest baked chicken breast recipe I know. A perfect baked chicken breast, plus some simple side dishes, makes a great dinner any day of the week. Quickly searing the chicken before putting it in the oven ensures a crispy skin, and the skin keeps the white meat extremely tender and juicy. If you are in a rush and want to skip that step, you’ll still end up with moist, juicy chicken, though the skin might not be quite as crisp.
Baked chicken is one of those dishes you can basically ignore in the oven, leaving you time to make the rest of the meal, set the table, or finish up those 10 other things you need to get done before dinner. Even if you let it cook for an extra 10 or 15 minutes, the skin will stay crispy and beautifully browned, and the meat will remain moist, thanks to the fact that the chicken is bone-in and is baked with its skin.
Many of us love baked chicken thighs for their richer flavor and tenderness, but I promise that if you cook your chicken breasts this way, you will get similar results. I love roasted chicken breasts with some mashed potatoes and a Greek-style salad; that to me is a perfect meal.
By signing up, you agree to our Privacy Policy.
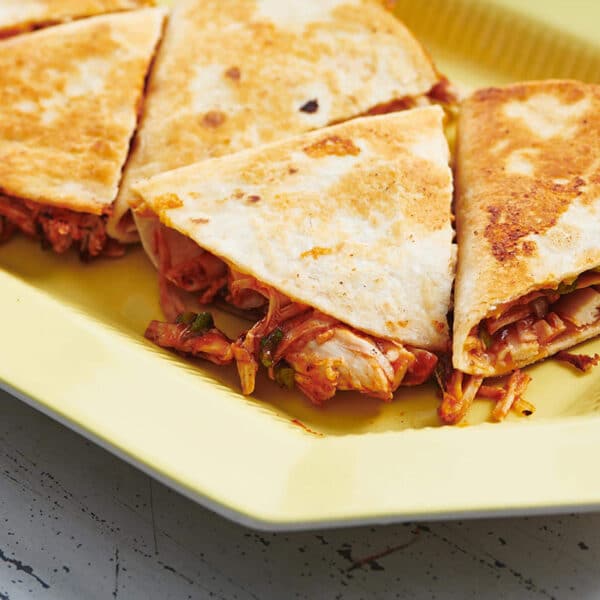
The next night, I’ll make the leftovers into quesadillas or enchiladas or just shred the chicken and see what I want to make later in the week!
What's In This Post?
Bone-In Chicken Breasts
At the market, you may find this cut of chicken labeled split chicken breasts. These are whole breasts that have been split down the middle into two halves. They will have the bone in, as well as the skin on.
It’s most convenient to buy these split chicken breasts, and that’s what I do most of the time. But, if you can find whole breasts and split them yourself, you will get breasts of similar size and also probably more skin. Split chicken breasts sometimes don’t have a whole lot of skin on them, and the skin protects the meat inside and keeps it moist. You can ask the butcher to cut whole chicken breasts in half for you as well.
Buying Chicken Breasts
Skin-on chicken breasts with the bone in are less expensive per pound than boneless skinless chicken breasts. Sure, you are paying for the weight of the bone as well, but even if you factor that in, it tends to be more economical. There are many versions of chicken available, such as free-range, cage-free, pasture-raised, air-chilled, and organic — pick the type that suits your budget and cooking approach.
Kosher Chicken
Kosher chicken is a bit more expensive than “regular” chicken, but the flavor is usually quite superior. Chicken that has been koshered means that it has been processed according to the laws of Kashrut. Kosher chickens have been buried in salt for at least an hour and rinsed with cold water. This creates a juicier and more flavorful bird in the same way as a brine does. Kosher chicken can be on the salty side, so be sparing when adding extra salt for seasoning.
Ingredients
The ingredient list is short and simple, and you should feel free to switch up the seasonings as you like. This is a basic recipe that you can change up as often as you like with different herbs and spices.
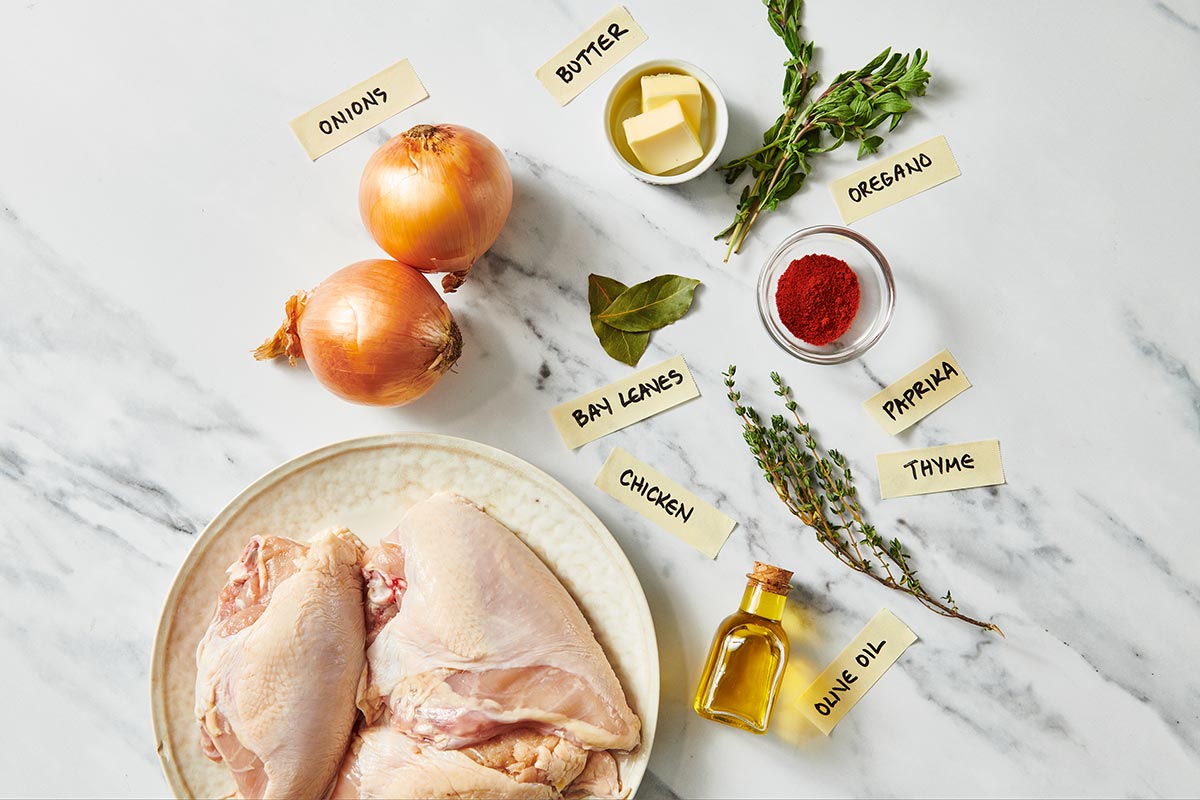
- Split chicken breasts – Make sure there is a nice amount of skin on your bone-in chicken breasts and that your chicken breasts are very close in size so they bake evenly. I prefer chicken breasts that weigh about 8 ounces (1/2 pound each).
- Butter and olive oil – Use a combo of unsalted butter and olive oil to sear the chicken, and then sauté the onions, which adds lots of flavor and helps with browning.
- Salt and pepper – Be generous with the seasonings. Unless you are using kosher chicken — then go lightly on the salt.
- Onions – The onions are the secret ingredient here, forming a base on which the chicken is baked. They practically melt into the sauce and add great savory flavor to the chicken.
- Paprika – Use regular paprika here, not hot or smoked. Paprika adds color and flavor to this dish.
- Thyme and oregano – You can use fresh sprigs of these herbs or dried. It’s also a nice touch to serve the chicken on a platter with some additional fresh herb sprigs. Also, try rosemary or marjoram.
- Bay leaves – Dried or fresh, bay leaves add a nice earthy note to the chicken and the sauce.
How to Bake Chicken Breasts
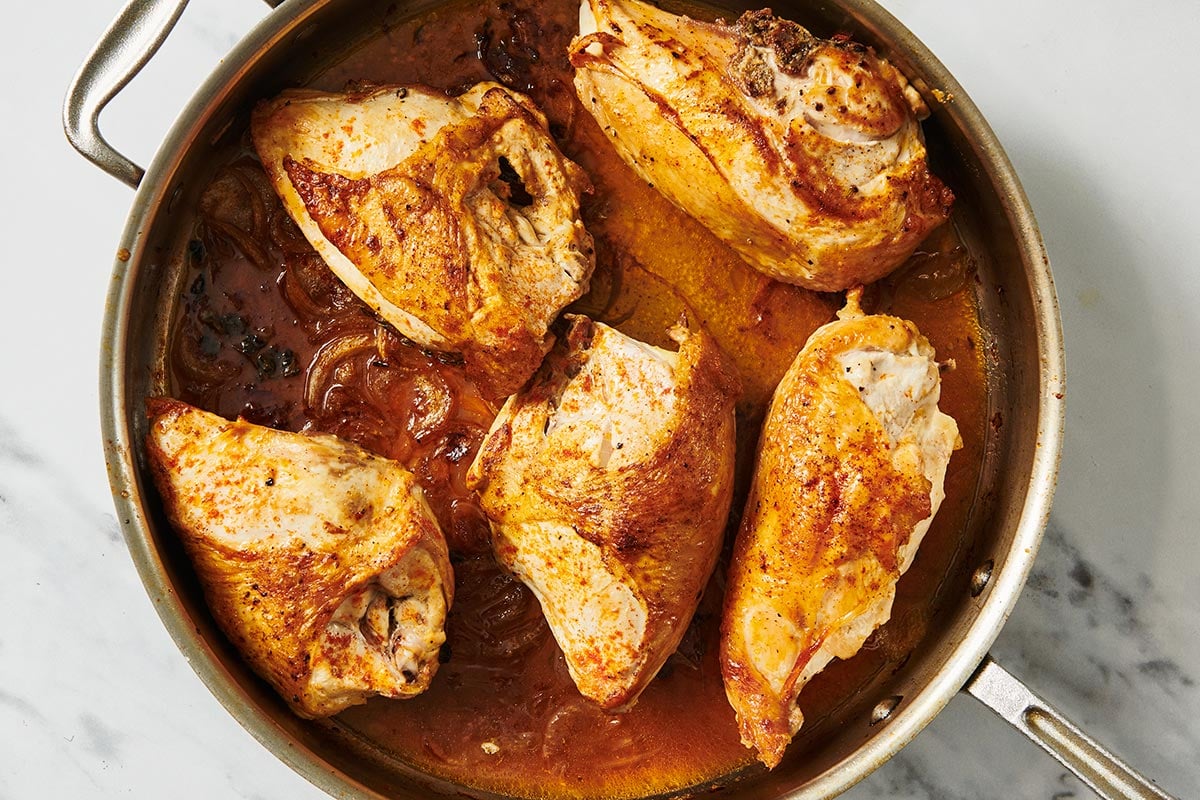
- Sear: Preheat the oven to 400 degrees. Pat the chicken dry with paper towels. Heat the butter and the oil in a large, heavy ovenproof skillet. Season the chicken with salt and pepper. Sear it on both sides for about 5 minutes per side until golden brown.
- Add onions: Remove the chicken from the pan and drain off all but about 2 tablespoons of the fat in the pan. Add the onions to the pan and stir to coat them with the fat.
- Season: Return the chicken to the pan, skin side up, on top of the onions. Sprinkle over the paprika, then tuck the thyme and oregano sprigs between the pieces of chicken along with the bay leaves, or sprinkle the dried thyme and oregano on top.
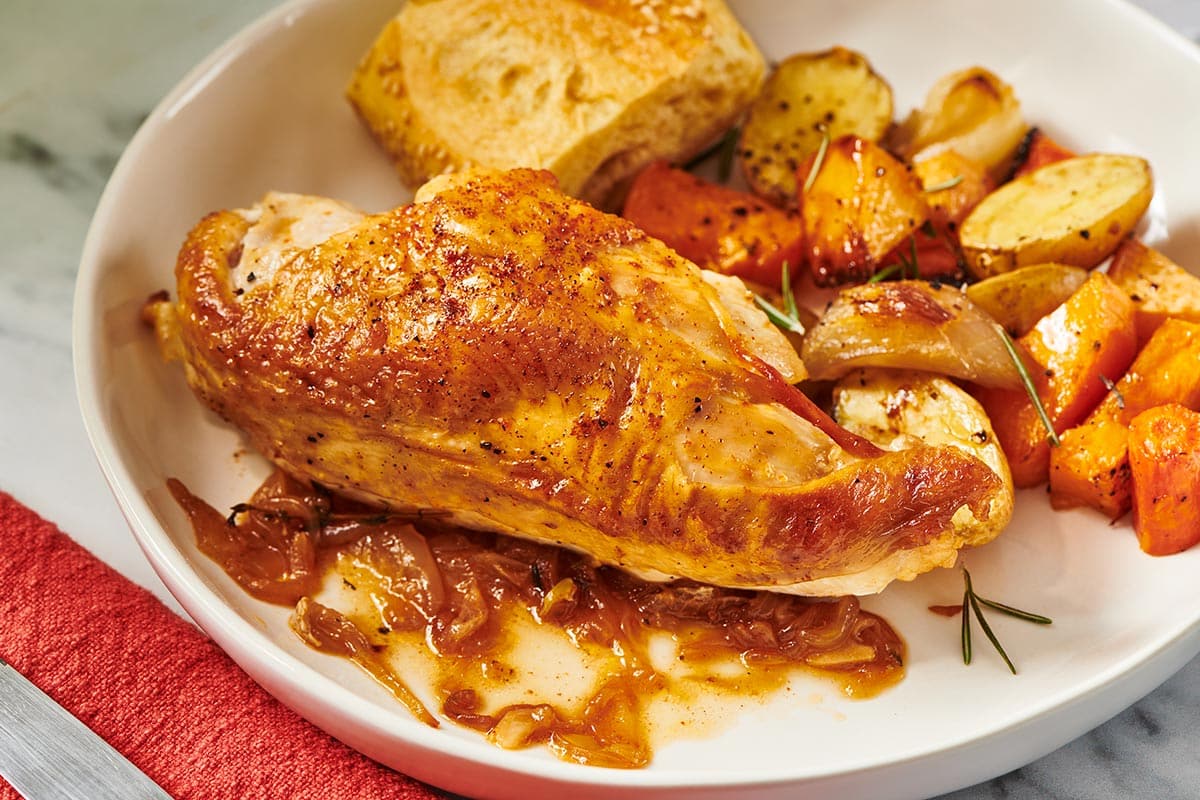
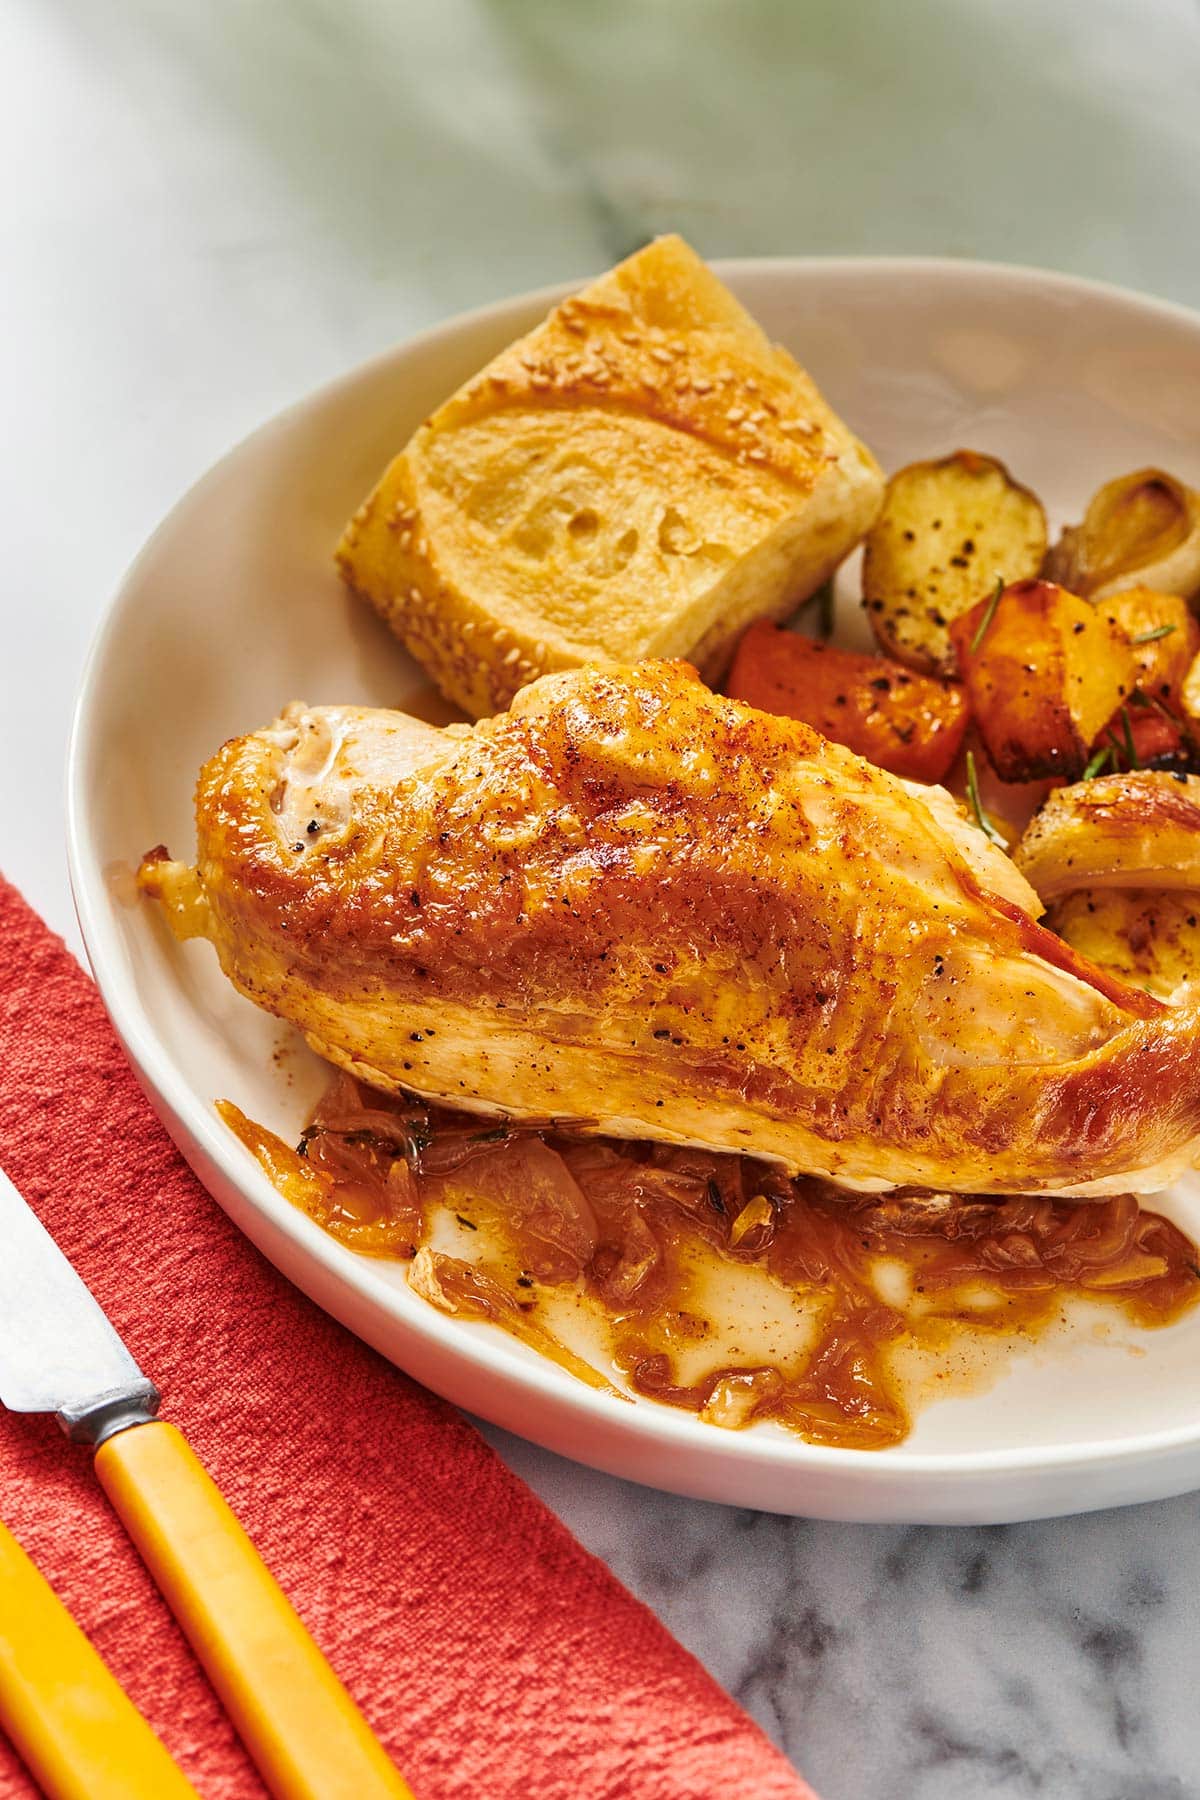
- Bake: Bake (or roast) the chicken for about 45 minutes to 1 hour, until the chicken registers 165°F on an internal thermometer and the juices run clear with pierced with a knife. The skin should be browned and crispy, and the onions should be soft and tender.
- Serve: Serve hot or warm with the onions on the bottom — give the onions a stir before serving so they blend into the lovely drippings on the bottom of the pan.
FAQs
I like to bake chicken breasts at 400 degrees, which crisps up the skin nicely and allows the chicken to cook evenly so the breasts stay moist and tender. If you want to bake the chicken at 350 degrees, plan to add another 10 to 15 minutes of baking time. Make sure to preheat the oven completely before baking the chicken for the crispiest skin and best results.
Bone-in chicken breasts will take about 45 minutes to 1 hour to bake at 400 degrees. The chicken needs to register 165°F on an internal thermometer, and the juices should run clear when pierced with a knife. The skin should be golden brown and crispy.
Yes, you can use boneless chicken breasts in place of bone-in breasts. However, the bone slows down the cooking process and helps the chicken retain moisture, so boneless breasts will cook much faster and dry out more easily. A higher temperature and shorter cooking time will make up for it.
I recommend searing boneless chicken breasts for 2 minutes on each side and then baking them for 15 or so minutes at 400 degrees. Otherwise, you can use the same seasonings and follow the recipe as written.
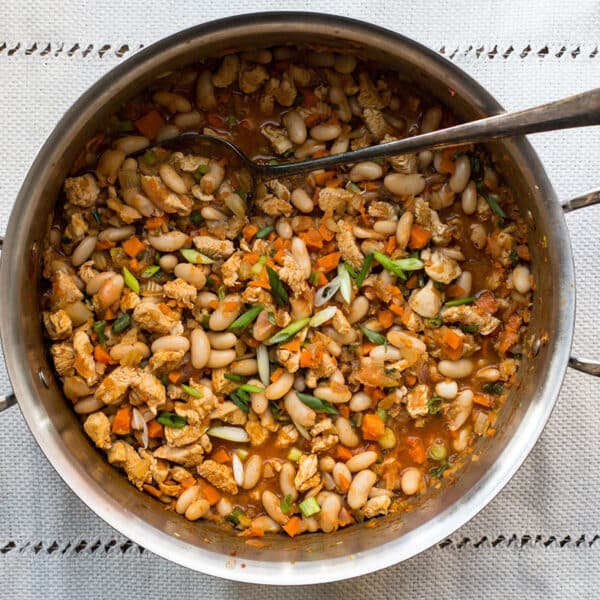
There are so many uses for leftover cooked chicken breasts. It’s well worth baking some extra chicken so you have them on hand for dishes later in the week. This chicken is perfect for shredding and all sorts of recipes — just remove it from the bone and use a fork or your fingers to pull it into shreds. Think Chicken Caesar Wraps, Chinese Chicken Salad, Easy Rotisserie Chicken and Cheese Quesadillas, Chicken Salad with Grapes. The white meat chicken lovers in your house will thank you!
Testing Bone-In Chicken Breasts for Doneness
The safe internal temperature for chicken is 165°F. As mentioned, you can definitely let them cook for a bit longer, as they will stay moist thanks to the bone and the skin. However, don’t overcook them too much, or the chicken will, of course, dry out.
The best way to check the internal temperature is with a meat thermometer. I love my ThermoPen, and a good instant-read thermometer is definitely worth the money. A more economical choice is the Thermopop pen.
Sometimes, if I know I won’t serve the chicken right away but it’s finished cooking, I’ll just turn off the oven and leave it in to keep warm.
Pro Cooking Tips
- Make sure to use a heavy ovenproof skillet to brown the chicken so you can transfer the chicken directly to the oven. Cast iron is great for this. However, you can transfer them to a baking dish if you don’t have an ovenproof pan.
- Brown the chicken before baking it for the best texture and flavor. You can skip this step if you are in a rush, but it definitely elevates the dish and makes the skin amazing.
- Preheat the oven before you start to brown the chicken breasts. This way, as soon as they are all browned, you can transfer the pan directly into the preheated oven.
- Let the chicken sit for 5 to 10 minutes before cutting into the breasts. The chicken will still be warm throughout, but this will allow the meat to reabsorb the juices as it rests, resulting in perfectly moist chicken breasts.
- You can also use another part of the chicken in this recipe; a whole cut-up chicken or just substitute thighs or legs for the breasts. The baking time is about the same.
- If you want to cut fat and calories, you can remove the skin before eating. However, most of us think the skin is one of the best parts of baked chicken, especially if you get it beautifully browned and crispy! Baking the chicken with the skin on will keep the meat flavorful and juicy, so even if you choose not to eat the skin, don’t remove it before baking.
Storage and Leftovers
- Leftover baked chicken can be stored in an airtight container for 3 days. You can remove the chicken from the bone before storing, or store the chicken pieces whole.
- You can remove the bones from the chicken after it’s cooked and before serving. Just carefully slice the chicken from the bone with a sharp knife. You can then use the bones to make stock, which means that you are economizing your chicken even more (follow the directions for making turkey stock)! And then that stock can be used in other recipes to give them a huge boost of flavor. Use the stock in soups, risottos, sauces, and so on.
- To freeze cooked baked chicken, place it in a freezer-proof zipper-top bag, press out any excess air, and freeze for up to 4 months. Defrost in the fridge for about 24 hours before using or reheating.
- To reheat baked chicken, heat it in a 350°F oven until warmed through, about 20 minutes.
What to Serve With Baked Chicken Breasts

More Simple Chicken Recipes
- Easy Baked Lemon Pepper Chicken Breasts
- Lemon Garlic Chicken Thighs
- Grilled Chicken Thighs
- Poached Chicken Breasts
- Oven-Baked Chicken Drumsticks
Pin this now to find it later
Pin It
Baked Bone-In Chicken Breasts
Ingredients
- 4 split chicken breasts
- 2 tablespoons unsalted butter (at room temperature)
- 1 tablespoon olive oil
- Kosher salt and freshly ground black pepper (to taste)
- 2 large onions (halved and sliced)
- 2 teaspoons paprika
- 4 sprigs fresh thyme (or 1/2 teaspoon dried thyme)
- 4 sprigs fresh oregano (or 1/2 teaspoon dried oregano)
- 2 bay leaves
Instructions
- Preheat the oven to 400 F. Pat the chicken dry. Heat the butter and the oil in a large, heavy, ovenproof skillet (cast iron is perfect for this) over medium-high heat until the skillet is hot and the butter is melted. Season the chicken with salt and pepper and sear it on both sides for about 5 minutes a side, until golden brown. If you need to do this in batches, that’s fine.
- Remove the chicken from the pan and drain off all but about 2 tablespoons of the fat in the pan. Add the onions to the pan and stir to coat them with the oil. Return the chicken to the pan, skin side up, on top of the onions. Sprinkle over the paprika, then tuck the thyme and oregano sprigs between the pieces of chicken along with the bay leaves, or sprinkle the dried thyme and oregano on top. Bake for about 45 minutes to one hour, until the chicken registers 165 F on an internal thermometer and the juices run clear with pierced with a knife. The skin should be browned, and crispy, and the onions should be soft and tender. Let the chicken sit for 5 to 10 minutes before serving.
- Serve hot or warm, serving some of the onions with the chicken. Once you lift the chicken breasts from the pan, give the onions at the bottom a stir. This will allow the juices that have dripped into the pan and the little crispy browned bit at the bottom to have a chance to blend into the onions — don’t waste any of that flavorful sauce!
Notes
- Make sure to use a heavy ovenproof skillet to brown the chicken so you can transfer the chicken directly to the oven. Cast iron is great for this.
- Brown the chicken before baking it for the best texture and flavor. You can skip this step if you are in a rush, but it definitely elevates the dish and makes the skin amazing.
- Preheat the oven before you start to brown the chicken breasts. This way, as soon as they are all browned, you can transfer the pan directly into the preheated oven.
- Let the chicken sit for 5 to 10 minutes before cutting into the breasts. The chicken will still be warm throughout, but this will allow the meat to reabsorb the juices as it rests, resulting in perfectly moist chicken breasts.
- You can also use another part of the chicken in this recipe. You can use a whole cut-up chicken or just substitute thighs or legs for the breasts. The baking time is about the same.
- If you want to cut fat and calories, you can remove the skin before eating. However, most of us think the skin is one of the best parts of baked chicken, especially if you get it beautifully browned and crispy! Baking the chicken with the skin on will keep the meat flavorful and juicy, so even if you choose not to eat the skin, don’t remove it before baking.


I was too lazy to bother with the onion, just seasoned salt and pepper on my chicken. I seasoned the chicken parts about an hour before cooking. I don’t have an oven proof skillet, so I transferred the chicken to a baking dish to finish in the oven. Minimal fuss for a delicious dinner ( especially welcome a week after Thanksgiving). I splurged and bought air chilled chicken– less “juice” in the package, less excess skin and fat to trim, and the chicken browns beautifully.